Lynis Enterprise - Self-Hosted Guide
Supporting documentation for Lynis Enterprise, with focus on the self-hosted version and its installation. For the installation of Lynis (client), please refer to the Lynis Installation Guide.
Lynis Enterprise (Self-Hosted)
Introduction
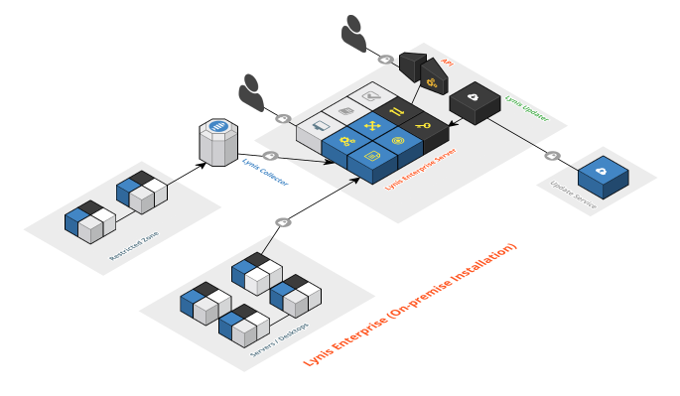
The self-hosted version of Lynis Enterprise runs within your IT environment. It is similar to the SaaS solution, yet hosted within the borders of your own network.
Software components
Lynis Enterprise consists of open source components, including its open source scanning client Lynis. To run the self-hosted version of Lynis Enterprise, the following components are used:
- Control Panel (web interface)
- Framework
- Interface
- Data definitions
- Lynis (client)
- Updater (installation/updates)
System requirements
To run Lynis Enterprise self-hosted, ensure that your system meets at least these requirements:
- 64-bit installation of Linux
- CentOS, OEL, RHEL, Debian, Ubuntu
- 1 GB of memory, preferably more
- 10 GB partition /data
We suggest using a new virtual machine, for maximum flexibility.
Note: These requirements do not apply to the client systems to be audited.
Installation
Lynis Updater
The installation of Lynis Enterprise begins with downloading the Lynis Updater. Customers will receive a license key, together with a link to download the latest Updater.
This tool is both an install and update tool. It performs the installation and ensures you always have the latest software updates. Besides software updates, it will also download and import data definitions. It performs system maintenance and activates the modules you are entitled to use.
Using the Lynis Updater
Install the Updater with the instructions received by email.
lynis-updater install
The 'install' command is safe to run multiple times, even on existing installations.
Master License Key
During the first run, the master license key is asked. If you don't have a valid key, cancel the installation and request one via our support. The license key is needed to receive software updates.
Applying updates
Installations that use package can keep the software up-to-date with the package manager of the operating system (apt, yum, and zypper). It is advised to run the Updater to execute any additional steps that might be needed.
lynis-updater update
Status
At any time you can confirm the status of the installation. The 'status' command will perform basic checks and displays the discoveries it made regarding program versions and the installation.
lynis-updater status
Database Configuration
Lynis Enterprise uses open source components. For storing data, the well-known database engine PostgreSQL is used. In this section we cover the related configuration bits.
Database Connection
To enable a connection, the pg_hba.conf file need to be modified. The location of this file depends on your operating system and version of PostgreSQL. First step is to determine where your pg_hba.conf is.
find / -name pg_hba.conf -print
Add the following line to the beginning of your pg_hba.conf file
local lynis_enterprise lynis_enterprise md5
This ensures that the user lynis_enterprise can connect locally to the database, with a hashed password.
Database tables
The database structure is automatically created after all software components are installed. Normally no action is required regarding the set-up of this part.
SSL certificate
By default a self-signed SSL certificate is generated. This enforces all Enterprise installations to use HTTPS and therefore use an encrypted channel to send data. Although this is a good step, it is even better to replace this self-signed certificate with your own certificate.
The self-signed certificate can be replaced by overwriting the <hostname>.key and <hostname>.crt file in /etc/ssl/certs. After replacing them, restart nginx to use the updated certificate.
Using a Proxy
When using a proxy in your environment, the easiest option is to define the proxy in the cURL configuration file.
Create the file /root/.curlrc with contents:
proxy = <host>:<proxy_port>
Users
Lynis Enterprise has different types of users.
- Super Users
- Normal Users
- Functional Users
Super Users
After installation of Lynis Enterprise, the Updater will provide the option to create a "superuser". This account type has a high level of privileges. This includes activities like creating company entities, license, and user accounts. Also activities for maintenance and status checking, are exclusively available to this user type.
Note: Even though it has high privileges, it can't view system data. If you are the administrator for your company, create a normal user with Administrator permissions. Store the superuser details securely.
Normal Users
Users can reset their password, by using an reset link via email. When email is not configured, the alternative is to perform this reset on the central system:
/data/lynis-enterprise/interface/bin/lynis_interface/manage.py changepassword user_name
Functional Users
For some actions, like automation and integration, functional accounts are being used. These are similar to normal users, with the exception that they have a specific set of permissions.
Security
Firewall Configuration
It is suggested to limit the connectivity to the central server and restrict the available protocols. Only allowing HTTPS (443/TCP) is required for the interface and data exchange. The client systems will connect to the central node.
- HTTP (80/TCP), optional - To redirect users who didn't specify https:// as part of the URL
- HTTPS (443/TCP) - To receive data, download updates, provide web interface and API
Monitoring and Maintenance
Monitoring
For the best experience and security, your self-hosted installation should be properly managed. This includes monitoring for performance and security, and doing the right maintenance. The Updater helps partially with this, but there are also things you can do.
System Usage
Relevant metrics regarding the hardware are disk usage, memory usage and processor utilization. Increase the capacity of these factors, if the system encounters high utilization on a regular basis. To prevent spikes, the system already spreads imports and other maintenance work as much as possible.
Lynis Enterprise Interface
To ensure the application runs properly, it is advised to monitor the machine. Add the system to your monitoring and monitor on port 443. We suggest to monitor https://your-address/status/ and let it check for a 200 response code. The page will output its status in JSON and return warnings or errors if something is wrong.
Database
The database might be the process using the most resources. We suggest to monitor it, and first increase the memory of the system if you have performance issues.
Maintenance
Upgrades
Step 1: Upgrade all packages on the system first
yum update
apt update && apt upgrade
Step 2: Run the Lynis Updater
lynis-updater update
Step 3: Restart the interface
systemctl restart lynis-interface.service
Step 4: Perform checks
Log in to the interface. Click on the sections you would normally use to see if everything works as expected.
Possible upgrade issues
Database model not migrated
Do you get an internal server error directory after logging in? Most likely the database models are not fully migrated yet and need to be performed manually.
/data/lynis-enterprise/interface/bin/lynis_interface/manage.py makemigrations
Note: if you get the question if you renamed a particular field, answer yes.
/data/lynis-enterprise/interface/bin/lynis_interface/manage.py migrate
Backup and Restore
The ability to restore your data is important. This section provides some insights to backup and restore your installation.
What to backup?
Install your own backup tooling and at least include /data and /etc in your backup. If you want to take the safe route, it is advised to also make a separate database backup of your PostgreSQL instance. The Updater utility does include another method to store database dumps, but better safe than sorry.
Packages
As a customer with an active license, you will have access to our repository. The Lynis packages provided on the repository are both in RPM and DEB format. They can be installed with the related package managers.
Backup list of packages
CentOS and RHEL
rpm -qa > /data/backup/packages.list
Debian and Ubuntu
dpkg --get-selections > /data/backup/packages.list
OpenSUSE
rpm -qa –queryformat '%{NAME} ' > /data/backup/packages.listRestore packages
CentOS and RHEL
yum -y install $(cat /data/backup/packages.list)
Debian and Ubuntu
dpkg --set-selections < /data/backup/packages.list
apt-get dselect-upgrade
OpenSUSE
zypper install $(cat /data/backup/packages.list)
Database backup
The Lynis Updater tool prepares automatic backups, which are done via the framework itself. These backups are performed daily and stored in /data/lynis-enterprise/backups. For every first day of the month, a "month backup" will be created. To save space, a maximum of 42 (30 daily, 12 monthly) database dumps will be stored.
The dumps created with the dump script, can be restored via the manage utility.
/data/lynis-enterprise/interface/bin/lynis_interface/manage.py loaddata file.extension
When using the loaddata function, ensure the file is unzipped and has the right extension. By using the head command you can peek into the data, which typically will be in JSON format.
PostgreSQL backups
Create a full backup
The backups made via the framework are a good start. It is advised to also create a backup of PostgreSQL itself. This is because of limitations within 'loaddata' functionality. First switch to the postgres user.
su postgres
Now create the backup:
pg_dump lynis_enterprise -f /tmp/migration.sql
Note: To backup all databases, use the pg_dumpall command instead
pg_dumpall --file=/tmp/postgresl-dump-$(date "+%F").sql
Tip: Run this backup daily via cron (as user 'postgres') or create a backup script to perform this action. Store the database not in /tmp, but at a location where other users can't access it.
Restore a database backup
Use the psql command to restore the data.
Switch to the PostgreSQL user
su - postgres
Optional: remove existing data first
Start the PostgreSQL client
pgsql
Delete the database, recreate it, grant privileges
drop database lynis_enterprise;
create database lynis_enterprise;
grant all privileges on database lynis_enterprise to lynis_enterprise;
Create a user/role:
postgres@server:~$ createuser --interactive --pwprompt lynis_enterprise
Enter password for new role: [provide password here]
Enter it again: [repeat]
Shall the new role be a superuser? (y/n) n
Shall the new role be allowed to create databases? (y/n) n
Shall the new role be allowed to create more new roles? (y/n) n
Create the database: createdb lynis_enterprise --owner=lynis_enterprise
Import the data. When an error occurs, immediately stop.
psql --set ON_ERROR_STOP=on lynis_enterprise -f /path/to/postgresql-dump.sql
Part V: Frequently Asked Questions
Hardware
What kind of hardware should I use to run Lynis Enterprise?
- Virtual machine with a 64-bit architecture
- At least 1 GB of memory
- Extendable /data partition of 10 GB
Firewall
What network ports should be opened?
The systems send their data via HTTPS (port 443/TCP). Also visitors of the interface use HTTPS. Optionally you could open port 80/TCP (HTTP), which will redirect users that did not provide https:// as part of the URL of the web interface.
Processes
How can I restart the Lynis Enterprise interface?
CentOS/openSUSE:systemctl restart lynis-interface
Debian/Ubuntu:/etc/init.d/lynis-interface restartWhat processes should be running?
At least: python processes, lynis-parser, nginx, postgres
Status
What is the best URL to monitor the application?
Monitor port 443 (HTTPS) and query https://your-hostname/status/ for a 200 code.
How can I test my monitoring is working?
Shutdown the Lynis Enterprise interface
Hostname
How can I change the hostname of my Lynis Enterprise system?
- Change the hostname of the system (e.g. /etc/hostname)
- Update the file /etc/hosts
- Update /data/lynis-enterprise/interface/bin/lynis_interface/lynis_interface/local_settings.py and add/update hostname
- Update /data/lynis-enterprise/updater/config and change existing hostname to new hostname
- Restart system
- Run lynis-updater update
- Check if everything works as expected
- Optional: change your monitoring URL
Part VI: Troubleshooting
We test out software extensively. If you still ever run into an issue, here are some tips to do the first line of troubleshooting.
Internal error
When you get an internal server error message, the page lacks details on purpose, to prevent information leakage. As a manager of the interface, you can still get more details. There are two common options for that:
- Option 1: send debug information by e-mail
- Option 2: send debug information to screen
Option 1: e-mail
A safe option is to configure an administrator to receive the debug data by e-mail. For that the mail configuration on the local system should be working correctly. Ensure that this is the case first. Next step is adding an administrator e-mail address to the local_settings.py file. When an error occurs, this address will be used.
echo "ADMINS = (('Name', 'your.name@example.com'),)" >> /data/lynis-enterprise/interface/bin/lynis_interface/lynis_interface/local_settings.pyAfter changing the configuration, restart the Lynis Enterprise interface
Option 2: screen
To activate this, change the local_settings.py file and set the DEBUG value to True.
echo "DEBUG = True" >> /data/lynis-enterprise/interface/bin/lynis_interface/lynis_interface/local_settings.pyNote: this option is useful for quick debugging, but not suited for running in production. It disables several tests, including overriding security controls. So after discovering the internal error message, remove the DEBUG line and restart the interface.
To test if the debug function is working correctly, use the internal Debug test. Log in as a superuser to the interface, and go to Internals section.
Reinstall interface
If the interface is really not working as expected, one option is to do a fresh install. Delete everything in the /data directory, or simply rename the lynis-enterprise directory to another name.
# Step 1: Delete interface files
rm -rf /data/lynis-enterprise/interface/*
# Step 2: Remove downloads
rm /data/lynis-enterprise/downloads/*
# Step 3: Run updater
lynis-updater install
1) Rename /data/lynis-enterprise to /data/lynis-enterprise2
2) Run updater
3) Cancel when it asks for details, then copy configuration file: cp /data/lynis-enterprise2/updater/config /data/lynis-enterprise/updater/config
4) Run updater again, to perform all actions
/data/lynis-enterprise/interface/bin/lynis_interface/manage.py makemigrations lynis_interface
/data/lynis-enterprise/interface/bin/lynis_interface/manage.py makemigrations
/data/lynis-enterprise/interface/bin/lynis_interface/manage.py migrate
If it shows: Applying lynis_interface.0001_initial... FAKED
Then force the migration.
/data/lynis-enterprise/interface/bin/lynis_interface/manage.py migrate --fake lynis_interface zero
Database migrations
Our software solution uses the rock-solid Django framework. It comes with a wide range of features, including a good abstraction layer to the underlying database engine. For upgrades of the database models, Django uses a migration utility. While solid between small releases, it may happen that your migration gets stuck. This can be caused due to failed migrations in the past, or having waited to long with upgrading. We have captured some troubleshooting steps to help you get the migration utility working again.
When to use
Typically you will use these steps when the Updater utility showed something was wrong with the database migrations.
Before you start
We suggest to open up a few terminal screens, or use a utility like tmux. This way all data is easy reachable and can be compared. Open the following screens:
Screen 1. Connection to the PostgreSQL database
# su - postgres
postgres@host:~< psql
postgres=# \c lynis_enterprise;
lynis_enterprise=# delete from django_migrations where app='lynis_interface';
lynis_enterprise=# \q
(most of the output is ommitted in this example) /data/lynis-enterprise/interface/bin/lynis_interface/lynis_interface/migrations/Screen 2. Migration directory
cd /data/lynis-enterprise/interface/bin/lynis_interface/lynis_interface/migrations/Screen 3. Work directory
cd /data/lynis-enterprise/interface/bin/lynis_interfaceAction 1: Compare the migrations on disk and in the database
There might be differences between the actual migrations that happened and the information the migration tool has been applied before.
\c lynis_enterprise;
select * from django_migrations where app='lynis_interface';

lynis_enterprise=# select * from django_migrations where app='lynis_interface';
 id |       app       |          name           |            applied
----+-----------------+-------------------------+-------------------------------
 11 | lynis_interface | 0001_initial            | 2015-11-16 23:46:54.772067+01
 14 | lynis_interface | 0002_auto_20160208_1207 | 2016-02-08 13:07:04.270267+01
(2 rows)
(screen 1: PostgreSQL output)Now have a look at the disk:
ls -l /data/lynis-enterprise/interface/bin/lynis_interface/lynis_interface/migrations/0*The output might look like this:
-rw-r----- 1 root www-data 36723 Nov 16  2015 0001_initial.py
-rw-r----- 1 root www-data 24063 Nov 16  2015 0001_initial.pyc
-rw-r----- 1 root www-data  5415 Feb  8 13:07 0002_auto_20160208_1207.py
-rw-r----- 1 root www-data  4694 Feb  8 13:07 0002_auto_20160208_1207.pyc
-rw-r----- 1 root www-data  8587 Apr  9 17:19 0003_auto_20160409_1519.py
-rw-r----- 1 root www-data  7804 Apr  9 17:19 0003_auto_20160409_1519.pyc
-rw-r----- 1 root www-data  1651 Jun 30 15:33 0004_auto_20160630_1333.py
-rw-r----- 1 root www-data  1922 Jun 30 15:33 0004_auto_20160630_1333.pyc
-rw-r----- 1 root root      3423 Jul 25 12:57 0005_auto_20160725_1057.py
-rw-r----- 1 root root      3057 Jul 25 12:57 0005_auto_20160725_1057.pyc
-rw-r----- 1 root root       453 Jul 25 13:01 0006_action_action_system.py
-rw-r----- 1 root root       969 Jul 25 13:01 0006_action_action_system.pyc
-rw-r----- 1 root root       493 Jul 25 13:05 0007_action_action_systemid.py
-rw-r----- 1 root root      1026 Jul 25 13:05 0007_action_action_systemid.pyc
-rw-r--r-- 1 root www-data     0 Jan 19  2015 __init__.py
-rw-r--r-- 1 root www-data   178 Jan 19  2015 __init__.pyc
In this case the data on disk has more migrations than available in the database. This is a first indication that something is wrong. We can confirm this by running the migration utility and list the available migrations.
/data/lynis-enterprise/interface/bin/lynis_interface/manage.py migrate --list lynis_interfacelynis_interface [X] 0001_initial [X] 0002_auto_20160208_1207 [ ] 0003_auto_20160725_1219We see two migrations have been applied. As expected, the third migration is not completed, as that was the one showing the error.
Remove failing migrations
As we are stuck on a migration, it does not make sense to keep it. Like in the example above, migration 3 and beyond are failing. So we remove those migration files, so we are just left with the first migrations. Before you make changes, copy the migrations directory.
rm /data/lynis-enterprise/interface/bin/lynis_interface/lynis_interface/migrations/000{3,4,5,6,7}*This command means delete all files that start with 0003, 0004, 0005, 0006 or 0007.
Checking the differences between database and model
The next step is comparing the database model and the actual database tables and structure. Since the migrations did not succeed, it is expected to see some mismatches.
/data/lynis-enterprise/interface/bin/lynis_interface/manage.py sqldiff lynis_interfaceBEGIN; -- Application: lynis_interface -- Model: AccountRole -- Table missing: lynis_interface_accountrole -- Model: ControlSnippet -- Table missing: lynis_interface_controlsnippet -- Model: Control_control_snippets -- Table missing: lynis_interface_control_control_snippets -- Model: PolicyRuleHelp_policy_rule_help_related_controls -- Table missing: lynis_interface_policyrulehelp_policy_rule_help_related_con2075 -- Model: PolicyRuleHelp_policy_rule_help_reference_links -- Table missing: lynis_interface_policyrulehelp_policy_rule_help_reference_links -- Model: PolicyRuleHelp -- Table missing: lynis_interface_policyrulehelp -- Model: PolicyRuleReference -- Table missing: lynis_interface_policyrulereference -- Model: PolicyRule_policy_rule_references -- Table missing: lynis_interface_policyrule_policy_rule_references -- Model: PolicyRule ALTER TABLE "lynis_interface_policyrule" ADD COLUMN "policy_rule_help_text_id" integer REFERENCES "lynis_interface_policyrulehelp" ("id") DEFERRABLE INITIALLY DEFERRED; CREATE INDEX "lynis_interface_policyrule_policy_rule_help_text_id" ON "lynis_interface_policyrule" ("policy_rule_help_text_id"); -- Model: ControlIgnore_controlignore_ignored_systems -- Table missing: lynis_interface_controlignore_controlignore_ignored_systems -- Model: Alert -- Table missing: lynis_interface_alert COMMIT;Running the SQL commands
Copy the full text (including the BEGIN statement and end with COMMIT;) and paste them in your screen running the psql client. See if that successfully commits. If not, see till how far it did complete, before showing errors. Try those again, then manually do line by line. When some keep failing, skip them for now. We will deal with them later.
Focus on missing tables
Most issues arise from missing tables. For that reason we might end up with a list
BEGIN;
-- Application: lynis_interface
-- Model: AccountRole
-- Table missing: lynis_interface_accountrole
-- Model: ControlSnippet
-- Table missing: lynis_interface_controlsnippet
-- Model: Control_control_snippets
-- Table missing: lynis_interface_control_control_snippets
-- Model: PolicyRuleHelp_policy_rule_help_related_controls
-- Table missing: lynis_interface_policyrulehelp_policy_rule_help_related_con2075
-- Model: PolicyRuleHelp_policy_rule_help_reference_links
-- Table missing: lynis_interface_policyrulehelp_policy_rule_help_reference_links
-- Model: PolicyRuleHelp
-- Table missing: lynis_interface_policyrulehelp
-- Model: PolicyRuleReference
-- Table missing: lynis_interface_policyrulereference
-- Model: PolicyRule_policy_rule_references
-- Table missing: lynis_interface_policyrule_policy_rule_references
-- Model: ControlIgnore_controlignore_ignored_systems
-- Table missing: lynis_interface_controlignore_controlignore_ignored_systems
-- Model: Alert
-- Table missing: lynis_interface_alert
COMMIT;
Create a new migration
With some manual steps already performed, we will now have the migrations utility do a retry on creating the missing tables.
/data/lynis-enterprise/interface/bin/lynis_interface/manage.py makemigrations lynis_interfaceNormally we would do a migration directly, but instead we will edit the migration file. The file itself is a fairly simple format, stating what it should do during the migration.
Open up the file in your migrations screen (3). Remove all actions that start with migrations.<action>, except those who are related to creating the missing tables (migrations.CreateModel).
Examples
Search for migrations.CreateModel and skip those. All others can be removed.
Good (=keep in the migration):migrations.CreateModel( name='AccountRole', fields=[ ('id', models.AutoField(verbose_name='ID', serialize=False, auto_created=True, primary_key=True)), ('accountrole_name', models.CharField(max_length=24)), ('accountrole_description', models.CharField(default=b'', max_length=256, null=True, blank=True)), ], ),Bad (=remove):migrations.AddField( model_name='account', name='account_allow_initial_password_change', field=models.BooleanField(default=False), ),Note: make sure that the last lines of the file are properly closing the brackets.
Perform the adjusted migration
Time to test the altered migration.
/data/lynis-enterprise/interface/bin/lynis_interface/manage.py migrate lynis_interfaceOperations to perform: Synchronize unmigrated apps: easy_pdf, django_nvd3, allauth, debug_toolbar, messages, staticfiles, django_extensions, rest_framework, humanize Apply all migrations: account, sessions, sites, auth, contenttypes, lynis_interface Synchronizing apps without migrations: Creating tables... Running deferred SQL... Installing custom SQL... Running migrations: Rendering model states... DONE Applying lynis_interface.0003_auto_20160725_1230... OKThis time the migration has been applied succesfully! One step closer.
Compare the database model
With this small migration, we have several new tables now. We can see the result when running the sqldiff helper.
/data/lynis-enterprise/interface/bin/lynis_interface/manage.py sqldiff lynis_interfaceBEGIN; -- Application: lynis_interface -- Model: Control_control_snippets -- Table missing: lynis_interface_control_control_snippets -- Model: PolicyRuleHelp_policy_rule_help_related_controls -- Table missing: lynis_interface_policyrulehelp_policy_rule_help_related_con2075 -- Model: PolicyRule_policy_rule_references -- Table missing: lynis_interface_policyrule_policy_rule_references -- Model: ControlIgnore_controlignore_ignored_systems -- Table missing: lynis_interface_controlignore_controlignore_ignored_systems -- Model: Alert ALTER TABLE "lynis_interface_alert" ADD COLUMN "alert_system_id" integer REFERENCES "lynis_interface_system" ("id") DEFERRABLE INITIALLY DEFERRED; ALTER TABLE "lynis_interface_alert" ADD COLUMN "alert_related_event_id" integer REFERENCES "lynis_interface_event" ("id") DEFERRABLE INITIALLY DEFERRED; CREATE INDEX "lynis_interface_alert_alert_related_event_id" ON "lynis_interface_alert" ("alert_related_event_id"); CREATE INDEX "lynis_interface_alert_alert_system_id" ON "lynis_interface_alert" ("alert_system_id"); COMMIT;We see the list got shorter with regards to the missing tables. For one table, new fields showed up. Copy the commands in your terminal running psql. Then run another sqldiff.
/data/lynis-enterprise/interface/bin/lynis_interface/manage.py sqldiff lynis_interfaceBEGIN; -- Application: lynis_interface -- Model: Control_control_snippets -- Table missing: lynis_interface_control_control_snippets -- Model: PolicyRuleHelp_policy_rule_help_related_controls -- Table missing: lynis_interface_policyrulehelp_policy_rule_help_related_con2075 -- Model: PolicyRule_policy_rule_references -- Table missing: lynis_interface_policyrule_policy_rule_references -- Model: ControlIgnore_controlignore_ignored_systems -- Table missing: lynis_interface_controlignore_controlignore_ignored_systems COMMIT;The list is shorter again. Now it is time to make a new migration and edit it again.
/data/lynis-enterprise/interface/bin/lynis_interface/manage.py makemigrations lynis_interfaceMigrations for 'lynis_interface': 0004_auto_20160725_1249.py: - Add field account_allow_initial_password_change to account - Add field account_allow_initial_password_change_key to account - Add field accounting_datetime to accounting - Add field accounting_title to accounting - Add field action_created to action - Add field action_description to action - Add field action_title to action - Add field action_updated to action - Add field alert_related_event to alert - Add field alert_system to alert - Add field control_data_fields to control - Add field control_snippets to control - Add field controlignore_ignore_all_systems to controlignore - Add field controlignore_ignored_systems to controlignore - Add field event_severity to event - Add field policy_category to policy - Add field policy_rule_data_fields to policyrule - Add field policy_rule_details to policyrule - Add field policy_rule_references to policyrule - Add field policy_rule_help_related_controls to policyrulehelp - Add field setting_level to setting - Add field system_hostid2 to system - Add field system_identifier to system - Add field system_last_updated to system - Alter field action_systemid on action - Alter field controlignore_comment on controlignore - Alter field event_type on event - Alter field license_active on license - Alter field license_maximum_scans on license - Alter field license_maximum_systems on license - Alter field license_subtype on license - Alter field license_type on license - Alter field policy_rule_function on policyrule - Alter field policy_rule_on_match on policyrule - Alter field policy_rule_on_miss on policyrule - Alter field policy_ruleset_description on policyruleset - Alter field system_domainname on systemOpen up the new migration file (in our case starting with 0004). This time we go hunting for just the fields we need, and remove the others.
Instead of focusing now on Migrate.CreateModel, we cherry pick the fields we are missing. For that, we have to look at the lines beginning with "-- Model:". The first word(s) with a capital is the model, followed by the field we need
Example
The related field names in our case are marked bold.
BEGIN; -- Application: lynis_interface -- Model: Control_control_snippets -- Table missing: lynis_interface_control_control_snippets -- Model: PolicyRuleHelp_policy_rule_help_related_controls -- Table missing: lynis_interface_policyrulehelp_policy_rule_help_related_con2075 -- Model: PolicyRule_policy_rule_references -- Table missing: lynis_interface_policyrule_policy_rule_references -- Model: ControlIgnore_controlignore_ignored_systems -- Table missing: lynis_interface_controlignore_controlignore_ignored_systems COMMIT;Migrate the edited migration file
Perform the migration. If something goes wrong, check if you have the right fields. When in doubt, remove the migration file and start over.
/data/lynis-enterprise/interface/bin/lynis_interface/manage.py migrate lynis_interfaceLast checks
The last step is checking if we all looks good. The sqldiff helper should say there are no differences.
/data/lynis-enterprise/interface/bin/lynis_interface/manage.py sqldiff lynis_interfaceRemove migrations
When everything looks good, we are almost done. We will remove now the migrations. If we don't do this, the migration tool might fail next time, as it is still a little bit confused about some fields. For that reason we used the sqldiff helper to be sure that every field in is the database.
Remove migrations from database
We remove first the migrations from the database. This is meta-data about the migrations on the disk.
lynis_enterprise=# DELETE FROM django_migrations WHERE app='lynis_interface';
DELETE 4
It removed the four successful migrations, which is good.
Remove migrations from disk
rm /data/lynis-enterprise/interface/bin/lynis_interface/lynis_interface/migrations/00*Fake initial migration
With everything cleaned up, we want to tell Django this new status. So we make a new migrations file first.
/data/lynis-enterprise/interface/bin/lynis_interface/manage.py makemigrations lynis_interfaceInstead of a normal migration, we will do a fake migration.
/data/lynis-enterprise/interface/bin/lynis_interface/manage.py migrate lynis_interface --fake-initialConfirm that you see the new initial migration.
/data/lynis-enterprise/interface/bin/lynis_interface/manage.py migrate --list lynis_interfaceStill having issues?
In case the solution on this page did not help you solving the issue, please provide the following information:
- Output of: ls -l /data/lynis-enterprise/downloads/
- Output of: /data/lynis-enterprise/interface/bin/lynis_interface/manage.py inspectdb
- Output of: /data/lynis-enterprise/interface/bin/lynis_interface/manage.py migrate --list lynis_interface
- Output of: /data/lynis-enterprise/interface/bin/lynis_interface/manage.py sqldiff
Advanced Settings
Configuration
For our solution we use the popular Django framework. This framework can be configured independently of our software. This is useful for defining settings like the time zone, email relay configuration, etc.
/data/lynis-enterprise/interface/bin/lynis_interface/manage.py print_settings
Email settings
By default the sender address is webmaster@localhost. To change this, edit the local_settings.py file.
DEFAULT_FROM_EMAIL="my-alias@example.com"
The reset link for emails is configured by the installer. In case it needs to be changed, use the 'set_default_site' command, followed by the domain (or --fqdn to set it to the full hostname including domain name)
/data/lynis-enterprise/interface/bin/lynis_interface/manage.py set_default_site --domain example.com --name "my domain"
High Availability
By default Lynis Enterprise has all components on a single system. The interface is light-weight and can be combined with the database engine.
To make the solution 'high available', several steps are needed. Please note that you are free to use a configuration like this, but only one-system installations are supported by our support team.
- Configure one system that will be the primary (web) server.
- Synchronize all files in /data to the secondary server.
- Install the same packages on the system. See the backup section on how to export all packages and import them.
- Make sure the Updater on the secondary system is not being used. This is to prevent two instances making changes to the database.
- Configure PostgreSQL with replication.